Installing PowerPrep GRE Software under Vista OS

After an endless search using Google and Bing on how to install PowerPrep GRE software on my older son’s computer which uses the Vista Operating System, I have found bits and pieces on the puzzle on various websites. However, I did not find the entire solution anywhere.

Therefore, I played with the many pieces of the puzzle solution that I found, added a few of my own and finally came up with a complete solution to this problem.

I have decided to share this solution in this blog as I know that many college seniors to be, have the summer off right now and would probably like to spend some time preparing for their GRE exams which is required for admission to many graduate schools.

First download and install the great WinRar compression utility software from this site:

http://download.cnet.com/WinRAR-32-bit/3000-2250_4-10007677.html

It is free to use and try for 40 days.

Now, download the PowerPrep GRE test prep software from this site:

http://www.ets.org/gre/general/prepare/powerprep/download/

Ignore the install instructions listed there as they only work if your operating system is Windows XP operating system or below.

Instead, right click on the file and click on,”RUN AS ADMINISTRATOR”.

blog1

Right click on it again and click on, “PROPERTIES”. Then click on the COMPATIBILITY tab on the top.

Now click on the square next to COMPATIBILITY mode so that a check-mark appears in the square. Click on the arrow below it and select, “Windows 2000”. Now click on the squares next to, RUN in 640 x 480 screen resolution and Disable Desktop Composition so that check-marks appears in the squares, Now click on APPLY and then OK.

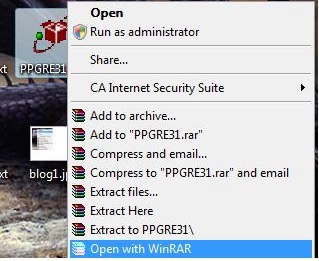
Now right click on the file PGRE31 and select, “OPEN WITH WinRAR”. It is very important not to extract the files with another other program. Only the WinRAR compression utility will extract the files using the correct length names that will allow the program to work and install in compatibility mode.

blog2

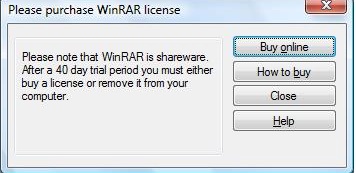
Select CLOSE on the window that appears.
blog7
As  soon as you close the window, the window shown below will appear. Now double click on the yellow folder shown in the window right underneath the word, “NAME” and the green arrow. Then select Disk1 and then click on, “EXTRACT TO”, right under the main menu on top of the program.

A window will appear like the one shown below asking you where to save it to, select the DESKTOP and click on OK..


The software will create a folder called PPGRE31 and extract all files to that folder. Now find the folder, double click it and you should see another folder called DISK 1. Double click on it. You should now see a window like this one.


Close the folders and now go to the start menu and click on RESTART. Press the F8 key just as your computer is restarting. Select, “Restart in safe mode with Networking”.

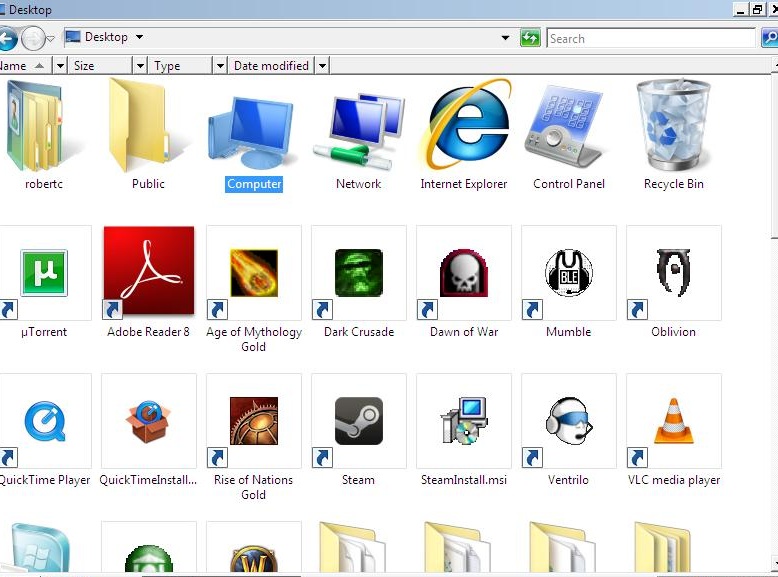
When the computer finishes booting, right click on the icon of my Computer icon and select,” EXPLORE”. At the top of the screen, click the arrow pointing down to select, DESKTOP.

Blogsafe1

If it does not appear on the list, just type next to the right arrow,” DESKTOP “. The following steps were also completed earlier in this guide and are repeated here and applied to a totally different file this time. This new file may or may not have inherited the same settings from the first time these instructions were followed.

Now scroll down and find the PPGRE31 folder and double click on it. Then find the folder named, “DISK 1″ double click on it and now right click on the file named,” SETUP” with the green color icon.

Click on,”RUN AS ADMINISTRATOR”. Right click on it again and click on, “PROPERTIES”. Then click on the COMPATIBILITY tab on the top. Now click on the square next to COMPATIBILITY mode so that a check-mark appears in the square.

Click on the arrow below it and select, “Windows 2000”. Now click on the squares next to, RUN in 640 x 480 screen resolution and Disable Desktop Composition so that check-marks appears in the squares, Now click on APPLY and then OK. Now double click on Setup and your software should install correctly. Now restart your computer in regular mode.

Now go to PROGRAMS, then click on POWERPREP and then on GRE_POWER_PREP. Your program will start, your screen resolution will change a bit and you can now run this software correctly.

If you followed this blog and the instructions worked for you, please consider leaving a message on this blog.

Solution for ATI Catalyst Driver Issue – Cannot Install – Error: INF File Not Found

Spent most of the morning today trying to figure out why my son kept getting a blue screen of death at random times while trying to watch a downloaded video or play any of this computer games. Other times, the problem would occur while my son was not even on his computer and the computer was in sleep mode. This problem has been happening on and off for months.

Occasionally, he also gets a message saying that his ATI Catalyst Driver was out of date and had to be updated. His desktop computer is a Gateway Model # GT5662, which comes with an ATI Radeon HD 2400 XT, 256 MB PCI video card.

After thinking about this problem, I suspected that the video driver that the Windows Vista 32 bit Operating System UPDATE utility had downloaded and suggested that my son install to replace the driver his computer came with, was not the right driver for his computer. I decided to go to the Gateway site to investigate whether my suspicion was correct.

I found out that the Gateway site had another video driver for download that was different from the one that my son was using. It also turns out that unfortunately, this driver was not a Windows digitally signed driver. Therefore, there was no way that the Windows Vista UPDATE utility could get it for us.

I decided to download it myself and try to install it. You can get the driver at this site: http://support.gateway.com/support/drivers/getFile.asp?id=21656&uid=269341864 It is considered one of the the ATI Catalyst drivers and downloads automatically with the Catalyst Manager Control Center software that must be installed at the same time as the driver. After downloading, it must be extracted and stored in the C:cabs folder.

Well, I first un-installed my son’s current driver, (which at the time that it was downloaded a long time ago was named, “9-6_vista32_win7_32_dd.exe”) using the PROGRAMS AND FEATURES control panel. The name of the file shows up simply as, “ATI”. At this time, Windows automatically substituted the generic VGA video driver.

I then installed the driver package from the Gateway site by going to the C:cabs folder and clicking on the folder titled, “D20235001-001.exe” and then clicking on the SETUP file. The install of the Catalyst Manager Control Center part of the package installed corrected but I then got a message that the driver itself could not install because an INF file could not be found.

Well, the main part of every driver is a file that ends with .INF and without it, nothing can be installed at all. As a matter of fact, if you happen to see one, you can usually just right click on it and a menu will appear that gives you several options. One of the options will state, “INSTALL” and if you click on it, that will install whatever driver it was supposed to install. Therefore, installing this package seemed to be a waste of time. Thinking that maybe the problem occurred because something went wrong during the first install, I then un-installed it using the using the PROGRAMS AND FEATURES control panel and re-installed it again, however I got the same message.

I started to research this problem and found out that it was very common. I found many tech supports forums where people were posting that they were at wits end dealing with this problem and that the Gateway tech support department referred them to the ATI tech support department and vise-versus. Some people even posted that they had given up trying to get help on how to fix the problem and just bought video cards from another company, installed them and were using the new cards instead.

I started to think about solutions to this problem that did not involve using the downloaded installer package to install anything. I remembered that in the early WINDOWS operating system days, I used to update my drivers using the DEVICE MANAGER control panel. I remembered that Vista still had the same control panel.

Therefore, I decided to try to install this driver using the DEVICE MANAGER. I selected the VGA driver, right clicked on it and clicked on the UPGRADE option. As the UPGRADE session started, the first step gave me the option to search the Internet or my own computer for the driver, I chose my computer. The next step gave me the option to browse my hard drive and chose the driver I wanted, I browsed and selected the driver folder from the C:Cabs folder mentioned above. It started the process of installing it, however I got a message at the end stating that it could not install it because the driver was not an official Windows digitally signed driver.

I started to research this new problem to find instructions for getting around this. I found that there was a option for turning this Windows Vista feature off on this site: http://www.mydigitallife.info/2007/08/15/workaround-for-vista-cannot-load-low-level-driver-signing-issue/ .

In a nutshell, the computer just needed to be rebooted with the F8 key pressed at start-up. This provides the computer user with a long list of boot options. One of the options states,” DISABLE FORCED DRIVER SIGNING”. So, I just selected it and continued booting. When the computer finished booting, I tried the above technique for installing the driver again. Wow, I was so shocked when it worked and I did not even have to un-install the Catalyst Manager Control Center software first or at all.

I then started to Google the actual driver that my son was using erroneously. It was indeed a digitally signed Windows driver from the ATI site but not one meant for our computer which was a Gateway brand one. It is for the same type of ATI video card that my son’s computer has, however the driver was not meant to run with all of the other Gateway propriety hardware. I imagine that this is why sometimes it played nice with the other hardware and other times, it decided to quit playing at all. 🙂

So far the computer has been working well this afternoon. I really hope it continues to work well. I did advise my son not to accept any new video drivers from the Windows Vista UPDATE Utility. To my surprise, just a few hours after I fixed the problem, my son informed me that again, the Windows Vista UPDATE utility found yet another video driver for my son to install.

I do plan to update this blog and possibly provide new troubleshooting ideas if the problem occurs again. In the meantime, hope this solution can help someone overcome this problem without having to invest money in a new video card. Please consider leaving a comment if this blog has helped you.

Apple Software Update Woes and What I have Learned (Revised Blog)

A few weekends ago, my youngest son’s Apple Power Macintosh G4 867 DP Mirrored drive Door Model # M8787LL/A computer crashed. The specs for this computer can be found on this site: http://www.everymac.com/systems/apple/powermac_g4/stats/powermac_g4_867_dp_mdd.html

He was running Mac OS Tiger version 10.4. 6. The OS somehow got corrupt and kept booting into single user mode and presenting the Darwin Command Line shell. If you have never seen it, it looks like this:

In this stage,the terminal would appear, cover the entire length of the monitor screen and it would present a black login command line window. When the user types in the login name and password, it seemed to start to boot normally but would promptly just come back to the same terminal. It seemed to be locked into an endless loop.

I thought I would be able to fix the situation quickly since I had previously installed AppleJack troubleshooting assistant software from: http://applejack.sourceforge.netwhich can be run in the Darwin command line window. Here is a screen shot of it:

I ran all of the tests shown on the screen shot. All worked correctly except it would not repair the disk successfully. At first, this led me to believe that my son’s hard drive was defective. However, since I teach Computer Programming, I know that error messages may not really mean what they state. A lot of times, a error message appears because it is the default and the program really doesn’t know what is wrong.

However, to double check, I quickly did a Google search on one of my other computers to find out which hard drive had originally shipped with the computer and found out it was an IBM 60 GB Ultra 7200rpm ATA/100 hard drive model # IC35L060AVVA07-0. I then did a search on this particular hard drive and found the shocking information found on this page about IBM hard drives: http://www.datarecovery24.co.uk/IBM%20IC35L060AVVA07-0.html Wow, what a eye opener. I guess this time, the error message was correct.

I quickly searched for a replacement hard drive and found a good alternative, I ordered a 80GB Western Digital Caviar 7200rpm UltraDMA 100/ATA drive for a very reasonable price. I used the video instructions shown on this site to install it: http://eshop.macsales.com/tech_center/index.cfm?page=Video/harddrive/g4mddata66/g4mddata66h.html I installed it as a secondary drive but made it the master drive. I left the original drive in the case and just pulled the cable off of it that connects it to the mother board.  Since the new drive is now the master drive, the original drive is now no longer recognized nor used by the system.

I decided to get my original OS OS Jaguar v10.2 G4 CD’s that came with the computer, put the cd in the DVD drive, held down the C key on the keyboard and started the install. I chose to install the original OS since it has some of my favorite apps that have been removed in Mac OS Tiger v10.4. 6. such as Iphoto and a few others. I then used Google to find instructions on how to update from this version to Tiger. I did so because there is another version of the Mac OS which is between these two and it is Mac OS X 10.3 Panther and I did not currently own it.

Found several pages that said to install Apple update fixes to Mac OS Jaguar v10.2 and that then I would be able to just skip the Mac OS X 10.3 Panther OS upgrade and just use my OS Tiger v10.4. 6 DVD to upgrade directly to it. They also stated that all I had to do was boot from my OS Tiger v10.4. 6 DVD to finish the upgrade. I followed these instructions which were unfortunately wrong.Everything crashed as soon as I tried to boot from the DVD and the computer started again in the Darwin Command line shell. The same situation happened again as in the beginning of this blog.

To make a long story short, this is what I learned about to completing the upgrade:

1. First boot from the Mac OS Jaguar v10.2 CD by holding down the C key on your keyboard. When you get the screen that states,”Welcome to the Mac OS System”. From the Installer Menu Bar, click Open Disk Utility. You will then see the Disk Utility window. Now complete the following instructions:

a. In the left pane of the Disk Utility window, click the drive you want to erase.

b. In the right pane of the Disk Utility window, click the Erase tab.

c. From the Volume Format drop-down menu, select Mac OS Extended.

d. In the Name field, highlight the existing text and type in a name for the hard drive and click on ERASE. Now quit the Disk Utility and then click on CONTINUE to start your Install.

2. After it gets done with the first CD, will ask you for the second Mac OS Jaguar v10.2 CD and it will finally boot. When it finishes booting. Remove the Mac OS Jaguar v10.2 CD from your DVD drive and insert your Mac OS Tiger version 10.4.6 DVD. You do need a DVD drive to do this.

3. The Tiger OS cd will start automatically and open a Window. Now click on INSTALL. You will get a message that it will require a restart and then start the install process. Click on ok.

4. After it finishes installing, your version will now be Mac OS Tiger version 10.4.6. You should now configure your internet connection and download the Mac OSX 10.4.11 PPC combo upgrade package from the Apple website.

5. Here are some do’s and don’ts:

a. Do not install any third party applications yet such as Firefox. Use Safari to download the upgrades. This is because third party applications may cause a conflict with the upgrade installs.

b. Do not use the automatic Apple Update utility to do this. It does not work well and may corrupt your OS system again. For example, if it is used to upgrade Java only, the next upgrade that contains the same version of Java will corrupt your OS system when you try to install it.

6. Instead go to http://support.apple.com/downloads/#MacOSXUpdCombo10.4.11PPC.pkg Download the 10.4.11 PPC Combo update package and run it. After running it, keep it handy as you will need it when you run into problems in the future.

7. At this point, you may want to go to the AppleJack site mentioned earlier in this article and download and install it.

8. When the computer restarts, then use Disk Utility, select your start up hard drive, click on the File Menu and hold down the option key. Click on Disable Journaling.
Now select your start-up hard drive and Repair Permissions. Now shut off the computer. You may like to restart it in single user mode by holding down the Option and S keys of your keyboard. When you get into the command line window, type in (paying attention to the upper and lower case words): applejack AUTO and hit the enter/return key. After it gets down running all of the tests, now restart the computer.

9. Now click on the Software Update from the apple menu on the top left side of your screen to install all Java related updates ending with Java for Mac OS, version 1.4 release 9 which can be found here: Java for Mac OS Version 1.4, release # 9.

Also install all security related updates. Once all the upgrades are done, now start installing third party applications if you like. Do not install Adobe Shockwave Player as I believe that one of the updates from Apple already includes it. Once you get done installing third party applications, repair the permissions again. If you get an error messages at any time, run the 10.4.11 PPC Combo update package again and again repair the hard drive permissions.

Your computer will now run efficiently and correctly. Hope this blog helps someone out there who may in the same situation.

Note: This blog was revised the day after I wrote it because I did further research and found out that the original hard drive was indeed defective.

Note: This blog was revised again on Dec. 18th, 2010 after I found new information to keep the computer running smoother.

Solving the Annoying Sparebackup Popup Problem

My son recently bought a new Gateway computer that unfortunately had Vista installed on it. I tried to upgrade his computer to Windows XP but there weren’t any XP drivers that worked with his new integrated Sound and Network cards. By the way, I am using the word, upgrade, here on purpose and it is not a typo. Laughing

He bought the computer from Circuit City and they preinstalled an online automated PC Data Storage software called,”Sparebackup”, found on this site: Sparebackup . You are probably wondering how I came to the conclusion that it was Circuit City and not Gateway which installed the software, well the following site hints that this may be the case: Tech Support Agreement site .

This software was configured to automatically start up during every boot. It would open up MS Explorer 7 once a day regardless of whether you were using it and display a popup advertisement reminding you that, “your Hard Drive will fail and urging you to use their service”. It did not matter that my son had the popup blocker activated, as it would bypass the blocker. I suggested that my son deactivate Java in his Windows Explorer 7 options and even this did not stop the problem. Needless to say, this was very annoying.

My son asked me for help. Usually, the first thing I do before offering anyone help is to Google the problem. This is how I came up with the possible Java solution which unfortunately did not work. However, the following sites looked promising:

Sparebackup Online Storage Site

GateWay Computer Support

Computer Help Forum

All three sites gave exactly the same solution however what they failed to mention is that you cannot uninstall a program that is running and this specific software is pre-configured to not let you quit the program. When you followed the instructions on the first and second site, a Windows message would appear informing you of this and stated that the programs will automatically be terminated by Windows. However, apparently this software was written to also bypass this Window’s feature.

I would then try to manually quit the program by right clicking on it from the Windows Vista Taskbar and left clicking on the EXIT button that appeared but it would not stop running. Here is a picture of the Window’s Vista Taskbar:

So after a few tries at uninstalling the program using the instructions provided and failing to achieve my goal, I decided to take a new approach.

I started the computer in safe mode and followed the instructions which again did not work. I then remembered my old friend, “MSCONFIG”, from Windows XP. I did not know whether it was still available in Windows Vista so I tested my idea by using the run command and typing in the program name. To my surprise, the program is still there and came right up. This is a picture of what it looks like:

I clicked on the STARTUP tab and found that this program was listed. I clicked on the little square to the left of it to get rid of the check mark and then clicked on the APPLY and OK buttons. Next I re-started the computer. I was now able to follow the instructions on how to remove it shown on the first and second site listed above.The problem is now resolved.

Another possible solution to end this program that I did not try was pressing the CTRL + ALT + DEL key combination which would bring up this dialog box:

Now click on,”START TASK MANAGER”, it will appear and looks like this

You would then click on the PROCESSES tab and find the name of the process you want to terminate. Select it and click on the END PROCESS button on the bottom of this window.

As I previously stated, I did not try this solution. This is because a lot of times, the name of the process does not match the name of the program that you are trying to terminate. Hence, if the name is different, you would not know which process to terminate. Also, sometimes there is more then one process that the program is running and if you do not terminate all of them, the program may still run.

I really hope this helps someone. Shame of these sites for not informing people how to properly uninstall this program. Shame also on the Sparebackup company for employing coercive marketing techniques.